In this blog post, we’ll show how we use nested virtualization and PCI passthrough with KVM hypervisors and OpenNebula. Most of the examples here are generic for these technologies and can be applied for any type of hypervisors or cloud orchestration, but there are also given some OpenNebula and KVM specific advice.
Nested virtualization is a technique to run virtual machines in other virtual machines – i.e. more than one level of virtualization. PCI passthrough is a method to give direct access to the real hardware to the virtual machines. These two technologies are not interrelated but are often used together.
There are many reasons why you may need to use nested virtualization, but the most common is in a development and testing environment. At StorPool we use extensively nested virtualization in our test and dev lab. StorPool storage software is used in production in many diverse environments, in different clouds like OpenStack, CloudStack, OnApp, OpenNebula, in conjunction with different hypervisors – KVM, Xen, XenServer, Hyper-V, VMWare and on multiple Operating systems at different versions. We need to test StorPool in various configurations of the above, and to be able to reproduce different scenarios that can be found at our customers.
To be able to build the needed environment in a fast and repeatable manner we’ve created a test cloud with OpenNebula and KVM hypervisors. In this cloud, we can set up many different environments in just a few minutes.
Running nested virtualization and PCI Passthrough
To be able to run nested virtualization and PCI Passthrough with reasonable efficiency, the following technologies are used and will be examined in more details in this blog post:
- Hardware virtualization support (VT-x)
- Nested virtualization
- VMCS Shadowing
- IOMMU (PCI Passthrough)
- SR-IOV
- ACS (IOMMU groups)
OpenNebula specific features are:
- OpenNebula PCI Passthrough support
- Libvirt domain XML tunning
Before starting with the specific features, here is the naming convention we’ll use. These names are the most commonly used with the subject:
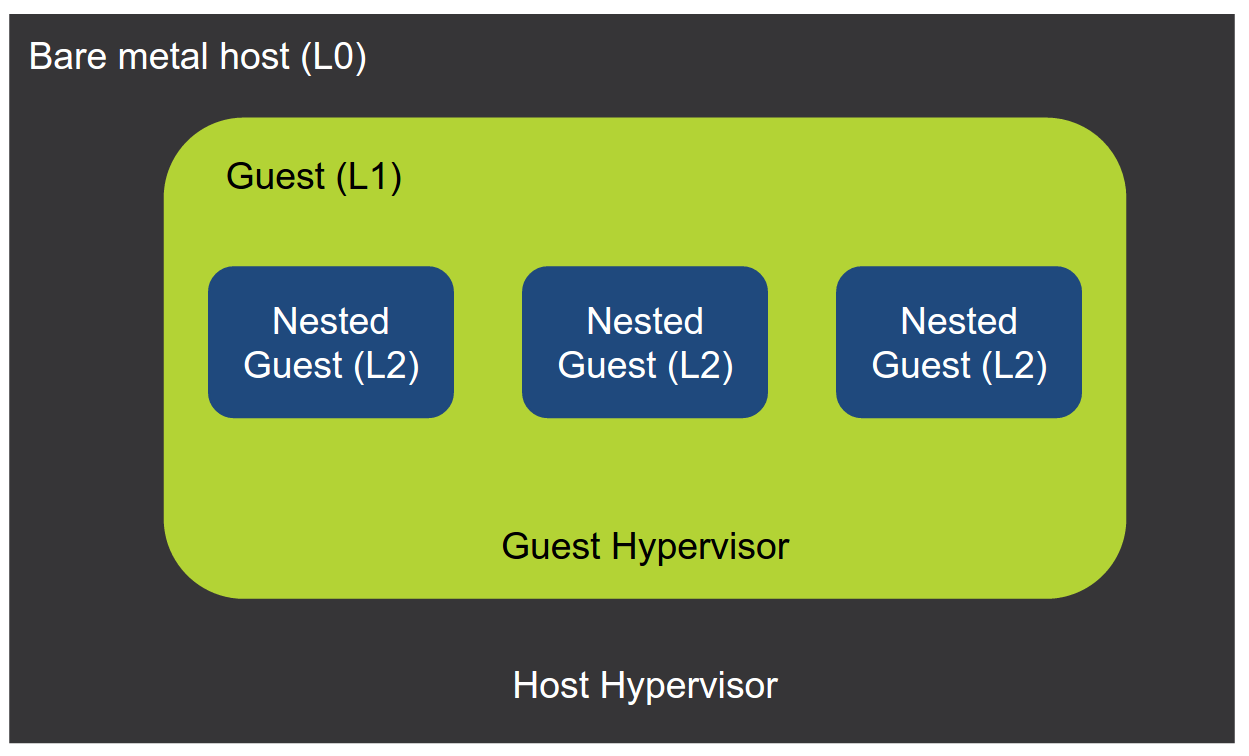
- L0 hypervisor, or Bare-metal host – this is the hypervisor that runs on the physical bare-metal server
- L1 hypervisor or Guest hypervisor – this is a hypervisor that runs as a virtual machine in the L0 hypervisor.
- L2 guests, or nested guests – these are virtual machines running in L1 hypervisor.
Hardware virtualization support
Hardware virtualization support or hardware-assisted virtualization is a set of processor extensions to the x86 architecture. These extensions address issues with the virtualization of some privileged instructions and the performance of virtualized system memory. Intel’s implementation is called VT-x and AMD’s implementation is called AMD-V. This feature was introduced in 2005 and 2006 and is available in most current CPUs. Some exceptions are lower-end Atom processor. However, this feature might be disabled in the BIOS.
To check whether hardware virtualization support is available on the host processor, check the CPU has the vmx flag with the command:
lscpu | grep vmx
Nested virtualization
Nested virtualization is a KVM feature that enables hardware-assisted virtualization in the guest hypervisors. With it, the guest hypervisor can leverage virtualization extensions of the physical CPU without need to emulate them in software.
This feature is enabled with kvm kernel module option:
Add in /etc/modprobe.d/kvm-intel.conf:
options kvm-intel nested=1
To if check nested virtualization is enabled, check for the vmx flag of the virtual CPU. In the guest execute:
lscpu | grep vmx
VMCS shadowing
Virtual Machine Control Structure is a memory structure where the virtual CPU state is stored on VM exit and restored from on VM resume. This happens every time the guest operating system performs a privileged operation. This is done in hardware, but then the hypervisor is a virtual machine, This function has to be emulated and causes multiple VM exits to the host.
With VMCS shadowing for every L2 VM, a VMCS is created in the host, that is shadowed in the L1 hypervisor. This way all VM exits are implemented in hardware reducing significantly the processing overhead. VMCS shadowing is not strictly required for nested virtualization, but it gives huge performance improvement, especially on workloads involving many context switches.
To be able to do this a hardware support in the CPU is required. This hardware feature was introduced in Haswell processors initially in 2013 and is available in most current server CPUs.
To use it you need to enable it in kvm kernel module:
In /etc/modprobe.d/kvm-intel.conf add:
options kvm-intel enable_shadow_vmcs=1
PCI Passthrough
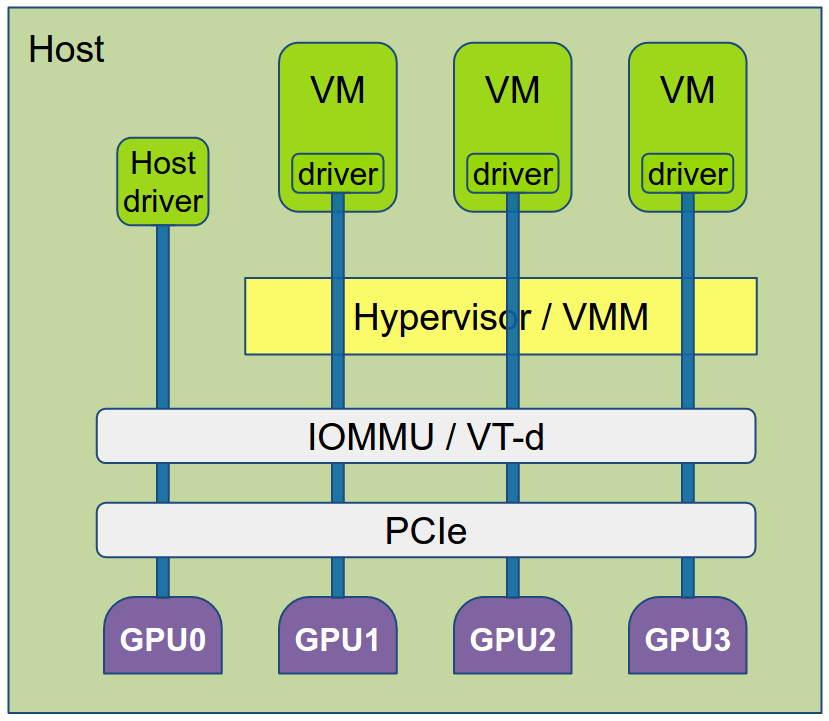
PCI passthrough provides direct, unrestricted, exclusive access from the guest to a physical PCI device. WIth PCI Passthrough virtual machine can use the hardware PCI devices bypassing all the virtualization layer and without any software emulation. This almost completely eliminates the processing overhead, but it has two significant limitations. First, the access to the device is exclusive – this means only one virtual machine can use the device – i.e. the device can not be shared between multiple virtual machines or between a virtual machine and the host. And second, the access to the device is unrestricted – i.e. virtual machine has full control over the device, including it is able to program the device’s DMA controller and interrupts.
PCI passthrough is not mandatory in order to have nested virtualization but they often go together.
To enable PCI passthrough, another technology – IOMMU is required. It is called VT-d by Intel and AMD-Vi by AMD. IOMMU translates virtual IO addresses as seen by the VM and the PCI device to physical addresses. It also provides memory region isolation, so a device used by a virtual machine will not be able to access or corrupt memory region not belonging to this VM.
IOMMU is available on most server CPUs, but often it needs to be enabled in the BIOS.
To allow PCI passthrough, it to be enabled in the kernel via a kernel boot options. There are different options for Intel and AMD CPUs:
Intel:
intel_iommu=on iommu=pt
AMD:
amd_iommu=pt
SR-IOV
SR-IOV or Single Root I/O Virtualization is an extension to the PCI Express specification and allows a single PCIe device to be shared between multiple virtual machines. It is most often used with network controllers, but some specialized server GPUs also support it.
A physical device with SR-IOV capabilities can be configured to appear in the PCI address space as multiple virtual functions. These Virtual Functions (VFs) are defined by the host operating system. The number of VF is limited by the hardware. By creating multiple VFs of the same physical PCIe device you can assign individual VFs to different virtual machines and this way to share the physical device, while at the same time provide exclusive access to each of the PCI virtual functions.
To use SR-IOV it needs to be supported by the CPU and the device to be virtualized. SR-IOV and VT-d have to be enabled in the BIOS.
You can create multiple VFs from the host using following command:
# echo '8' > /sys/class/net/eth3/device/sriov_numvfs
In this example, we create 8 VFs for the device eth3.
ACS and IOMMU Groups
PCI passthrough is a very efficient mechanism to reduce the overhead, but it creates several security issues.
Using the device DMA, a virtual machine can access the physical memory of the host. IOMMU solves this by translating the device virtual address space to physical addresses with a mapping that matches the virtual address space of the virtual machine.
But there is another problem. PCIe specification allows PCI devices to talk directly to each other directly not involving the system memory or the CPU. This enables a PCI device under control of one VM to access another PCI device controlled by another VM and this way to gain access to its resources.
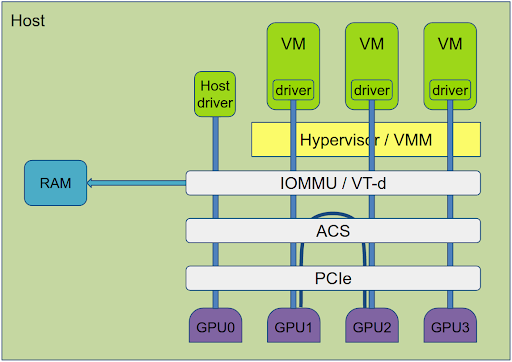
To solve this a new mechanism is introduced – Access Control Service or ACS. It is built in some CPUs and PCI bridges in the chipsets and controls peer-to-peer access between PCI devices.
To use PCI passthrough you need to have ACS available. You can check it with this command:
lspci -vv | egrep “Access Control Services”
Different implementations of ACS varies and with some ACS, not every PCI device can be controlled individually – some devices are controlled in groups – IOMMU group. The access control policy is applied at the group border, and communication between the devices in the same group is unrestricted. Devices that can be individually controlled are forming separate IOMMU groups.
To get how PCI devices are grouped in IOMMU groups use this command:
for a in /sys/kernel/iommu_groups/*; do find $a -type l; done | sort --version-sort
All devices that are in the same group have to always be used together. This means that if for example the network controller and the disc controller are in the same IOMMU group, you can pass them via PCI passthrough to a VM but always both devices together. If any of the devices in the group have to be used by the host operating system, no other device in the same group can be given to a VM.
Pay attention that even some server CPUs have very limited support of ACS. For example, Intel Xeon E3-12XX series CPUs are not suitable for PCI passthrough because most of the PCI slots are in the same group.
Unfortunately, there is not a good way to tell if a given CPU and motherboard will work or not, without having them and check the IOMMU groups with the command given above.
A good article on this subject can be found here: https://heiko-sieger.info/iommu-groups-what-you-need-to-consider/
With this, a KVM host is ready to be used with nested virtualization and PCI passthrough. The following instructions are specific to OpenNebula.
Enable PCI passthrough in OpenNebula
To use PCI passthrough in OpenNebula, the devices first has to be listed. OpenNebula is using host monitor to collect the available devices. This monitor is a script that is run regularly by OpenNebula on each host. It is located at:
/var/lib/one/remotes/im/kvm-probes.d/pci.rb
and it is configured with a configuration file at:
/var/lib/one/remotes/etc/im/kvm-probes.d/pci.conf
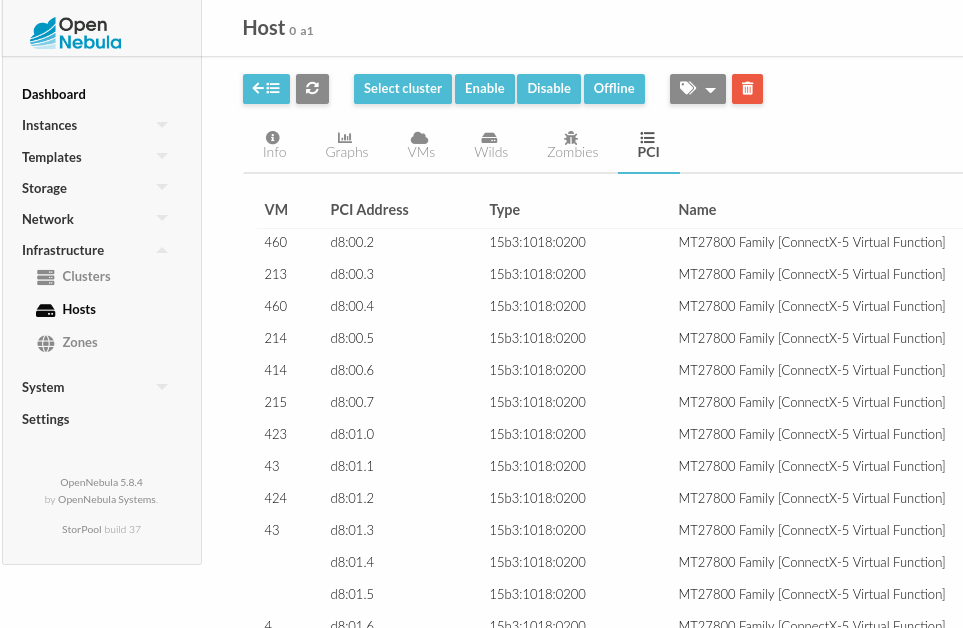
In this configuration, you can define which devices will be listed in OpenNebula as available for PCI passthrough. You can select devices based on PCI Id, PCI address or PCI device name. Example of configuration selecting Mellanox ConnectX-5 Virtual Functions:
:filter: '15b3:1018'
:short_address: []
:device_name: []
If devices are properly discovered they will be listed in the host details in PCI tab like this:
libvirt domain XML tuning
OpenNebula generates libvirt domain XML definition for PCI passthrough as a generic PCI device. This works OK for most devices but is not optimal for NIC VFs. If you use the definition as it is generated by OpenNebula, virtual machines will have unrestricted access to the physical network. VMs will be able to access any VLAN and listen to any packet on the physical interface.
To limit the access of a specific VF only to one pre-defined MAC address, domain XML definition has to be altered. This will still allow access to any VLAN, but at least it will prevent access to the traffic of the neighboring VMs.
libvirt domain XML has to be changed from this:
<hostdev mode='subsystem' type='pci' managed='yes'>
    <source>
      <address  domain='0x0000' bus='0xd8' slot='0x00' function='0x5'/>
    </source>
    <address type='pci' domain='0x0000' bus='0x01' slot='0x01' function='0'/>
</hostdev>
To this:
<interface managed="yes" type="hostdev">
  <driver name="vfio" />
  <mac address="02:00:11:ab:cd:01" />
  <source>
    <address bus="0xd8" domain="0x0000" function="0x5" slot="0x00" type="pci" />
  </source>
  <address bus="0x01" domain="0x0000" function="0" slot="0x01" type="pci" />
</interface>
We have developed a script that can alter domain XML definition in flight before it is passed to libvirt for VM deployment. It is included in StorPool add-on for OpenNebula and it is available here: https://github.com/OpenNebula/addon-storpool/blob/master/docs/advanced_configuration.md#vms-domain-xml-tweaking .
The script can be used stand-alone. It can also be used to alter any part of libvirt domain XML definition, not only the example above, thus providing greater flexibility and control on the VMs created by OpenNebula.
Nested virtualization and PCI Passthrough – Conclusion
With the techniques listed above, we are successfully using our OpenNebula testing cloud to run efficiently KVM, Xen, XenServer, OracleVM Server, and Hyper-V hypervisors as virtual machines. We still have trouble with the stability of VMware ESXi and some versions of XenServer, that when needed we still run on bare-metal servers.
See more:
StorPool Supporting the OpenNebula Community at OpenNebula Conf 2019